In my last post I went over a little bit about the Rock the Block Promotion from CTMH. Here you'll find the official CTMH video. Look for an upcoming post where I show you how to turn the collage blocks into a fun game for family, teachers, or home school parents!
I have a few of these on hand now and I have so many different ideas for using them that I will probably use them ALL!
Have fun!
Saturday, December 31, 2011
Tuesday, December 27, 2011
New Close To My Heart!
I had to give a little post as I haven't in awhile and share with you the new goodies CTMH is offering. FIRST:
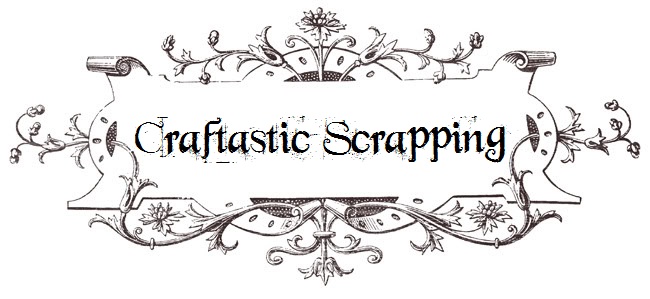
Until January 31st you can get 2 new products from the NEW spring/summer catalog for only $15 with a qualifying purchase: Those 2 products are the Block Collage set valued at $14.95 and a NEW size E stamp set valued at $29.95 Purchasing is easy, just visit my website HERE.

The next thing I have to tell you is this:
I've already got my Spring/Summer catalogs in! I'll post a sneak peak here and there just for you of some of my favorite must have items!

I apologize for the poor picture quality, but if you want to see the new catalog give me a call! I have only 10 available!
Contact me today to schedule your gathering, or to inquire about club/workshop events!
Have a great day and happy Crafting!
Tuesday, November 22, 2011
Glass Etching On Coasters
I got this great idea from a blog post I saw, and couldn't resist making my own. I wish I could give the nice lady the credit so, if you are out there... THANK YOU! Here is what I did:

* I went to Lowe's and purchased the glass tiles from the bathroom/kitchen tile section. I also bought the cork backing from Lowe's in the kitchen drawer lining section. I know.. there really isn't a "section", but it the aisle where that stuff is sold.
* Next, I selected a design from my Cricut cartridges and chose this tea set theme from my Heirloom cartridge. I LOVE this cartridge for so many reasons. I bought it for doing my family tree scrapbooking and have used it for everything I can think of.
* I bought the glass etching cream at Hobby Lobby, and the foam brushes I picked up on sale at Michael's when they were only 5 cents!
* After choosing my picture, I cut it on my cricut onto vinyl at 3"
* I then pulled the image off and flattened it out onto the glass tile.
* I covered the area around the picture partway and the details with the glass etching cream and I simply followed the directions on the bottle. I waited 5 minutes and rinsed it off with tap water.
* After all my tiles were done and dried, I cut out the cork backing the size I needed to completely cover the back of the tiles.
These make nice coasters, but also they would be cute as a hot pad I think. Just be careful to not scratch your glass. I am going to make some of these as Christmas gifts, and I REALLY like the cork backing versus cork circle feet or the velvet feet circles.
For those really suave home decorators though, imagine selecting glass tiles at intervals in your home and adding your own personal touch with the glass etching cream to make it truly unique. I chose a picture, but really the sky is the limit with monograms, phrases, or motifs.
Happy Crafting!

* I went to Lowe's and purchased the glass tiles from the bathroom/kitchen tile section. I also bought the cork backing from Lowe's in the kitchen drawer lining section. I know.. there really isn't a "section", but it the aisle where that stuff is sold.
* Next, I selected a design from my Cricut cartridges and chose this tea set theme from my Heirloom cartridge. I LOVE this cartridge for so many reasons. I bought it for doing my family tree scrapbooking and have used it for everything I can think of.
* I bought the glass etching cream at Hobby Lobby, and the foam brushes I picked up on sale at Michael's when they were only 5 cents!
* After choosing my picture, I cut it on my cricut onto vinyl at 3"
* I then pulled the image off and flattened it out onto the glass tile.
* I covered the area around the picture partway and the details with the glass etching cream and I simply followed the directions on the bottle. I waited 5 minutes and rinsed it off with tap water.
* After all my tiles were done and dried, I cut out the cork backing the size I needed to completely cover the back of the tiles.

These make nice coasters, but also they would be cute as a hot pad I think. Just be careful to not scratch your glass. I am going to make some of these as Christmas gifts, and I REALLY like the cork backing versus cork circle feet or the velvet feet circles.

For those really suave home decorators though, imagine selecting glass tiles at intervals in your home and adding your own personal touch with the glass etching cream to make it truly unique. I chose a picture, but really the sky is the limit with monograms, phrases, or motifs.
Happy Crafting!
Sunday, October 16, 2011
Homemade Baby Wipes!
Ok, this has nothing to do with CTMH, but it is really cool and I thought I would share. I have to credit my sister Jennie Murphy with this idea, and I don't know who she got it from, but this is what you need:
Materials:
(2) Glad or Rubbermaid Containers (big enough to hold a toilet paper roll)
(1) Container of Coconut Oil (I got some organic from Wal-Mart)
(1) Roll of Bounty Paper Towels (Get the kind where you can select your own size towel)
(4) Cups of water.
(1) Really good cutting knife
This is what you do:
Cut the paper towel roll in half.
Put 1/2 of the roll in 1 container, and the other 1/2 in the other container
Mix together 2 cups of water and 1 tsp of coconut oil
*You can also add a few drops of essential oil at this point (think lavender or something soothing!)
Pour mixture into container with paper towel, add lid, and turn upside down.
Do it again for the next container.
After about 5 minutes you should be able to pull the center of the roll out of the paper towels and just make sure you know where the start of the roll is. Voila! You are done!
The coconut oil lasts forever and can be used for all kinds of things from cooking, skin treatments, or more baby wipes! Your cost per tub after your initial set will be about 75 cents. Much better than the $2.99 for 80 wipes and you are making over 200!
I found a website with other recipes and other types you can take a look at called Full Circle Baby
I hope you enjoy! Within the next week, check back for redone clipboards, and some cute recipe books I am making with the new CTMH catalog papers!
Have a great week!
Monday, September 5, 2011
It's In the Box
Hello to all who stumble upon this post today! It is labor day and I am spending the day at home with my kids who are all out of school as am I. This morning I woke up knowing I needed to work on my own homework and work on my lesson plans for this week, but I couldn't fight my creative bug this morning and had to make a little treat.

I got this idea from Split Coast Stampers. If you've never visited, I promise there is so much inspiration for cards, scrapbooks, and paper crafts, you won't be sorry! It is free to become a member and you can browse galleries for projects as well as the forums. I modified my box just a bit to suit my needs, but the tutorial and measurements can be found HERE.
Here is a list of my supplies:
Retired Close To My Heart coordinating papers
CTMH's Liquid Glass
CTMH's Borders
Cricut Art Philosophy Cartridge
Scissors
Retired CTMH decorative grosgrain ribbon
Dbl sided tacky tape (red rolls)
Pair A Phrase Stamp Set
CTMH Heavenly Ink
CTMH Cocoa Ink
I followed the tutorial for cutting my paper and scoring my paper, but instead of doing the embellished cut around the box top, I used the Kraft borders. Then I used ribbon to help the transition of papers.

On the top of my box, I used my Cricut Art Philosophy cartridge to cut out these tags. I made the top layer a 2" tag and the bottom layer a 2 1/4" tag. Then I used the pair a phrase stamp set to stamp an image in heavenly blue in the back ground and I used cocoa to stamp the words in the foreground.

Right now I'm working on making flowers to add to the top, but you can do so much with this little box.
Now as you've seen from the tutorial this box can be used for 3x3 cards. But how about a little treat box? Or you could put words of encouragement on slips of paper in the box. There is so much you can do, and the best part is it was made by you, so that makes it more special for the one receiving it. I hope you've enjoyed!
Until next time, happy Craftastic Scrapping!
Sunday, August 28, 2011
It's the end of August!
And I really haven't accomplished much at all! It has been a crazy time.
1) I'm working on my Master's degree.
2) I left my secure full-time job to teach! (I'll be a long-term substitute this year and praying for a position for next year)
3) I went to Scentsy convention! (Yes... I sell Scentsy... and I LOVE IT)
But! Never Fear! I'm working on a project! I have a daughter who has been diagnosed with bipolar disorder and developmental delays. The real challenge has been discipline. She is sometimes all over the place. And this is what happened:
1) Listened to a friend talk about how her granddaughter has a treasure box. This box holds all kinds of cool stuff that if the little girl is good she gets to choose from. Just 1 item per day. But she has to earn her item through good behavior.
2) I told a story to my sister about how my mother asked my daughter if she'd rather have a spanking or miss dessert. My daughter chose the spanking. So my mother made her skip dessert LOL. My sister says to me... hmm... she's reward driven.... I said hmmm... you are right.
3) So I was on the hunt for materials to make her a treasure box of her very own! When I'm done, I'll get it posted.
But let me tell you my ideas for what to give her. I found a great place that sells hairbows for $1. I know... I make them right so why would I pay for them! (Time is the answer here). And we have a $1 costume jewelry store in town, plus some added little this' and that's from the $1 store in town. I'm not even done with the box yet, but she sure has been good in anticipation!
I'll post again with pictures, and ideas soon!
Sunday, July 17, 2011
Client Gifts

If you've read any of my posts before, you know that I'm in sales for my full-time job. Part of what I do is giving the clients little tokens of appreciation, and I'm stretching my imagination because I want what I had out to be a bit more personal.
Today I made some Starbucks coffee gifts. It was really easy. I found some great coffee cups at a $1 store, some brown crinkle filler, some clear party bags, and I have tons of ribbon laying all over the place. I headed over to Starbucks and bought their Coffee Via and this is what I did:

Step 1: Cut out a 2 1/2" X 3" card (I used a creme cardstock)
Step 2: Get a corner rounder and round the corners out
Step 3: I stamped on them, a little pot with steam and Thank You
Step 4: I aged the paper by using a sponge to distress the edges all the way around
Step 5: Sink this down into the cup so the words face out
Step 6: Put in the Starbucks Coffee Via
Step 7: Put in the Brown Crinkle filler
Step 8: Put in the clear party bag
Step 9: Tie close with ribbon.
There ya go! Inexpensive ways to show your appreciation! Here are my finished cups.

New Catalog... A great Deal! A Great Sunday!
Close To My Heart has finally unveiled their fall/winter catalog to their consultants and man is it AWESOME! Customers can view the catalog beginning Aug 1 on my CTMH website. But... I'll give you a little sneak preview what is new:
1 - EXCLUSIVE Cricut Cartridge! This cartridge has over 700 cuts and comes with 3 stamp sets and 3 chipboard sets! Best of all the catalog is layed out showing you what stamping sets the cricut cartridge has cuts for! ONLY $99. And there is buzz that for the August launch there will be a purchasing incentive to make it 1/2 off! I'll let you know when I know more!
2 - Stamp price DECREASE! Yep... some of the stamps and stamp of the month stamps have new pricing.
3 - GORGEOUS new papers. I don't want to spoil it but for all those zebra print fans, lets just say there is a set that has you in mind!
4 - AWESOME holiday sets! Papers for fall, Halloween, and Christmas! And of course... gorgeous stamps for all the holidays.
I can't wait for you to be able to see all the wonderful things CTMH has done for this upcoming season!
Now for my steals and deals! Today I went into Michael's to get some Cricut mats for my cricut. I always wander back in to the clearance section to see what I can find... And I found a GREAT deal.

Yep. Retails for around $69.95.... and I paid $29.99! I'm so excited for the upcoming workshops!!
And... I think I've fallen in love with a new cutting system. Not that I don't LOVE my cricut... but... check out the Pazzles. Crazy name AMAZING things you can do.
 Visit the Pazzles Website and check it out!
Just a quick overview:
1 - No cartridges
2 - This machine can cut, WRITE, distress, emboss, etch, and well... the list goes on and on. This is a definite must LOOK at!
Plus... they even have a commercial version for those that are in business.... just saying...
If you google "Pazzle $99" you can find the link to pay only $99 for this machine instead of $599 by getting a two year subscription to the Pazzles craft room. They also have a $199 option with a 1 year subscription which if you can afford the extra bucks up front makes this machine cheaper!
Happy shopping :) If you get one let me know what you think. I'm trying to hold out and not do it, but I don't think I'll hold out for long!
Saturday, July 9, 2011
Booking Board
I got this idea on the Journey to Director board on the CTMH forums, so I can't take any credit. But I loved it so much I had to make my own! This is called a booking board:

All you do is set these up at your parties and encourage your attendees to book a party. They use a dry erase marker to book a date. You can either pre-select open dates they can sign up next too, or they can choose their own, your choice.
What I really liked about this project is that it is manageable for so many businesses. You don't have to be a crafting Queen to have one of these for display. It would work great for any Direct Sales consultants. Imagine it at your Scentsy, Mary Kay, or WHATEVER table.
My materials:
12 X 12 scrapbooking frame (purchased @ Michael's)
You & Me scrapbooking set from CTMH
I used cocoa Ink, and the small and large chocolate alphabet sets.
I love these papers and all I did was a little inking to make some of the paper looked distressed and there you go!
I'm thinking of offering pre-made one's for sale on my website store. But this pretty girl is mine!
Happy Weekend!
Wednesday, June 29, 2011
Update: Being Creative With Your Job
I am getting ready to take my first basket over and wanted to add a special little something. This idea came straight from Jeanette Lynton's Originals book. Wish I was smart enough to come up with this design! If you don't own a copy of her book you are missing out! Click my link on the side bar to order your's today!
At any rate: here is my creation for a client!
I hand stitched the little pocket and used some cute pieces to really make the card pop. I'm really hoping the client likes it and thinks WOW she made this herself just for me!
Have a great night everyone!
At any rate: here is my creation for a client!

I hand stitched the little pocket and used some cute pieces to really make the card pop. I'm really hoping the client likes it and thinks WOW she made this herself just for me!
Have a great night everyone!
Card Challenge
Hey everyone, I made a little card for a card challenge you can see HERE. The theme was buttons, so I got my inspiration from a card in the Originals book by Jeanette Lynton and this is what I came up with:
Here is what I used:
Fanfare B&T's X7138B
pg 13 Originals by Jeanette Lynton
Dutch Blue Ink Z2119
Tulip Ink Z2166
Sunkiss Yellow Ink Z2151
Thoughtful Seasons (Happy Birthday Stamp) D1299
Jubilation (Fireworks stamp) D1457
Shining Star (Star Stamp) D1320
Foam adhesive (to make things pop)
Daisy Buttons
Have a great card for buttons? I'd love it if you'd share! Happy Crafting!
Monday, June 27, 2011
Being Creative With Your Job
I know many people don't have to think twice about how to be creative, unique, and absolutely personal in everything they do, but I'm a slow learner ha ha! So I'm going to share my insight with you just in case you are a slow learner like me!
My full-time job is in the construction industry. My clients or rather my company's clients range from the small business owner to the Fortune 500. My job is to go out and sell our product, maintain customer relationships, and develop new customer relationships. Yes, that makes me a salesperson. For those who think "Ewww... sales" I promise its not bad, it is actually a lot of fun. For those of you that think "Oh... the easy life" I promise you, I do more paperwork than the office manager! Here is what I've been pondering on here lately though.
I go out and visit clients and get to take them to lunch, dinner, social events, drop by their offices, and sometimes bring them little tokens to remind them that they like doing business with me. Some company calls these marketing tools. I know you've seen them and you've got several around your home and office. Pens, pencils, paper, envelopes, sticky pads, koozies, coffee cups... all bearing said company's logo. Well, I get to buy these wonderful items too. Only I can't handle being the "average" salesperson, so I'm taking it a step further. Here is what I want to do:
1) Gift baskets - Yes, put the all important pens and paper in there, but also make chocolate chip cookies, or muffins, or brownies. Add a bow, and a personal handmade card.
I know many of you maybe thinking.. um, I can buy these and don't need to spend time making them. Well, there are two reasons for me wanting to do this instead of just buying them.
1) My clients are personal to me. I want them to know I consider them important enough to spend my time on them.
2) You never know where your talents of client relations will lead you. Who might see this basket?
3) I just find it great to make people smile, and I've never had anyone say... oh... wonderful... she brought cookies....
4) I'm saving my company money. Yep I will. I am a smart shopper and put the ingredients together of a beautiful basket that would cost over $100 for a fraction of the cost!
*I tested this theory out by the way: I went to a local "snazzy" gift basket establishment and bought some baskets for clients. The baskets were $40, $30, and $20 respectively. This is what I found.
I could have bought baskets like those at the dollar store.
The most expensive basket contained about $2 worth of goodies in it (if you were to make them up and divide the pieces up the way they did)
Great for that company for making such a tidy profit. Great for me for figuring out, I could save my company $38 per basket. And since I have 100's of clients and 100's of more potential clients, that's A LOT of dough!
So boss man, if you should happen upon this blog one day.... recognize you have an awesome employee!
Now I'm off to make a batch of Thank you cards. Nothing says customer appreciation like a THANK YOU! How often do you hear it while you are out shopping?
Have a great day!
Wednesday, June 22, 2011
Card Fun
I love to make cards and so for Father's day I sat down with some of my scraps to get a few pieces made up. I used some scrap papers and some retired CTMH papers. Of course the inks are CTMH. What have you made this week? I made the card above using retired CTMH papers and I played around with a masking technique I saw on a Tim Holtz demonstration. I love his techniques! You can see him explain what I was attempting here :)
The card below is one I made for my dad. I used a cute little stamp I found, some CTMH chocolate brads, my cuttlebug and some great CTMH ink sponged on the texture for effect.

Here are they both together :)

I would love to see what everyone else is up to!
Have a great day :)
 I made the card above using retired CTMH papers and I played around with a masking technique I saw on a Tim Holtz demonstration. I love his techniques! You can see him explain what I was attempting here :)
The card below is one I made for my dad. I used a cute little stamp I found, some CTMH chocolate brads, my cuttlebug and some great CTMH ink sponged on the texture for effect.

Here are they both together :)

I would love to see what everyone else is up to!
Have a great day :)
Saturday, June 18, 2011
New Techniques
Ever since I became a crafting kind of girl, I've always looked for new and interesting ways to make my pieces more one of a kind, and more detailed. I look at trends, but I also hunt down videos on how to do new techniques to bring new dimensions to my crafting. My first love in crafting was for hand made cards. This probably started when I was a little girl making little cards and cut outs for my parents when I was in school. If you have kids, then you know the cards I'm talking about. Happy Mother's Day! Happy Father's Day! Merry Christmas! I can remember working to my heart's content on the best card my parents had ever seen. I did after all have 3 other siblings to compete with! As I've grown older, my desires for my cards have changed. Now I try to create cards that the receivers study and hopefully enjoy for the little details that went into making each one.
Since I'm all about new techniques, I am going to share one I thought was pretty cool. Close To My Heart has rub-ons that are too cute to believe. Yes they are letter and numbers, but they have newspaper typeset within them! How cool! Here is a short demonstration video about how to use them!
Access Video HERE!
I have been busy making cards, and have added the rub-ons on my must have list! I am already imagining the cards I can create. I will upload some of the work I've been working on soon, but don't want to spoil the surprise for those who are receiving them! This is a busy time of year for me with lots of birthdays, anniversaries, and holidays!
If you are interested in ordering the rub-ons or the chocolate ink, please shop at my CTMH website.
If you've created artwork with the rub-ons, or do in the future, please feel free to share your artwork! I'd love to see what you've created.
Have a Craftastic Day!
Sunday, June 5, 2011
Masculine Card
I love when inspiration for something comes from several different sources. My inspiration for this card came in part from the Lucky Workshop On The Go kit (G1018) and a sketch challenge that I saw over on Paper Craft Planet. I essentially combined the two to create this:

Here is what I used:
Lucky Workshop On The Go (Papers and Instructions) - G1018
A Tulip Stamp Set - A1111
Enjoy Life Stamp Set - C1439
Kraft Borders - Z1377
Mocha Adhesives - Z1333
Finishing Files - Z1091
Topiary Ink - Z2155
Moonstruck Ink - Z2134
Here is what I did:
1. Cut out the dimensions as laid out in the Workshop On The Go kit.
2. Picked a Kraft Border from my set that I liked.
3. Picked my Inks and the stamps I wanted to use.
4. I put the card together similar to Card 2, but I added the Kraft Border and moved the paper labeled "D" into the base area of the card.
5. I first distressed all of the edges of my B&T papers.
6. I then seasoned my new stamps and used a mixture of the Topiary and Moonstruck inks to stamp the images on the papers I wanted.
7. I then adhered the papers in the order I wanted to get the type of layering I was after.
8. My last and final touch was to put the Mocha Adhesives along the Kraft border for a little 'POP'
I really love the Lucky Workshop On The Go kit. It provides SO MUCH PAPER to make all kinds of cards and scrapbook layouts. The only limit is your imagination!
This card is a great masculine card, and with Father's Day coming up who couldn't use one of those! Until next time, have a Craftastic Scrapping time!
*Please note that I added elements to my card that were not included in the Lucky Workshop On the Go kit, however the kit contains EVERYTHING you need to do projects similar to the one I have done!*
Saturday, June 4, 2011
Making Your Lip Balm Containers Cute Part 2
Hey everyone! Glad you made it over to part 2 where we really get to have some fun. I want to encourage everyone who reads this to really think outside the box. How you decorate is up to you, I'm just going to give you tips and share what I did!
I used:
My Reflections Level 2 Lucky Papers - X71378
Exclusive Inks Stamp Pad in Cocoa - Z2114
A Huge Thanks Stamp Set - W185
Personal Paper Trimmer - Z338
Micro-Tip Scissors - Z534
Pen
Cutting Knife - Z1252
Tombow Mono Adhesive - 1514
My first step was to choose the paper from my Lucky pack that I wanted to use. I then used a scrap piece of paper to measure the length and width of paper I would need to cover the body of the lip balm tube.
I found that 2 1/4" X 1 7/8" was the perfect fit for me.
I cut he paper I selected and then applied adhesive to the back of the paper. I put adhesive along the leading edge, ending edge, and some in the middle to help it stick to the tube.

I then wrapped it around the tube firmly and smoothed out any wrinkles or air bubbles.
My next step was flipping the container upside down and tracing on the back of my scrap paper the lid of the lip balm tube.
I then cut this lid out using scissors.
Afterwords I applied adhesive to the back of the paper and then adhered it to the top of the lip balm. I found I had a little overhang, but used my craft knife to trim that off so the paper was flush with the lid diameter.
Now this is where it gets interesting for me:
I had this white space around the lip balm lid I wanted to fill. Here are some ideas for how to fill up that space:
Ribbon - Adhere ribbon around it the same way you did the paper.
Sparkles - You can use adhesive sparkles here as well (CTMH product numbers Z1327, Z1326, Z1104, and the list goes on!)
Stamp - I am seeing if this is going to work but am waiting to let the ink set and dry for 24 hours. I used StayzOn ink (CTMH product numbers Z1142 or Z888) and I stamped a message around the lid.
My last step was stamping a cute little flower on the lid using my Cocoa Ink and a flower from my stamp set.
I'd love to see what you come up with for all of your lip balm tubes!
These are great gifts for friends, co-workers, teachers, bosses, customers, and even for yourself! Coordinate your lip balm with your outfits!
Remember, you don't need to make your own lip balm to do this project, you can buy some from the store or a direct sales consultant in the beauty business! I encourage you to shop with your small business owning friends and help them to grow their businesses!
Have a great day and until next time! I'll be dreaming up a new project!
I used:
My Reflections Level 2 Lucky Papers - X71378
Exclusive Inks Stamp Pad in Cocoa - Z2114
A Huge Thanks Stamp Set - W185
Personal Paper Trimmer - Z338
Micro-Tip Scissors - Z534
Pen
Cutting Knife - Z1252
Tombow Mono Adhesive - 1514
My first step was to choose the paper from my Lucky pack that I wanted to use. I then used a scrap piece of paper to measure the length and width of paper I would need to cover the body of the lip balm tube.
I found that 2 1/4" X 1 7/8" was the perfect fit for me.
I cut he paper I selected and then applied adhesive to the back of the paper. I put adhesive along the leading edge, ending edge, and some in the middle to help it stick to the tube.

I then wrapped it around the tube firmly and smoothed out any wrinkles or air bubbles.
My next step was flipping the container upside down and tracing on the back of my scrap paper the lid of the lip balm tube.
I then cut this lid out using scissors.
Afterwords I applied adhesive to the back of the paper and then adhered it to the top of the lip balm. I found I had a little overhang, but used my craft knife to trim that off so the paper was flush with the lid diameter.

Now this is where it gets interesting for me:
I had this white space around the lip balm lid I wanted to fill. Here are some ideas for how to fill up that space:
Ribbon - Adhere ribbon around it the same way you did the paper.
Sparkles - You can use adhesive sparkles here as well (CTMH product numbers Z1327, Z1326, Z1104, and the list goes on!)
Stamp - I am seeing if this is going to work but am waiting to let the ink set and dry for 24 hours. I used StayzOn ink (CTMH product numbers Z1142 or Z888) and I stamped a message around the lid.

My last step was stamping a cute little flower on the lid using my Cocoa Ink and a flower from my stamp set.
I'd love to see what you come up with for all of your lip balm tubes!

These are great gifts for friends, co-workers, teachers, bosses, customers, and even for yourself! Coordinate your lip balm with your outfits!
Remember, you don't need to make your own lip balm to do this project, you can buy some from the store or a direct sales consultant in the beauty business! I encourage you to shop with your small business owning friends and help them to grow their businesses!
Have a great day and until next time! I'll be dreaming up a new project!
How to Make Lip Balm AND Make It Cute! PART 1
The first project I wanted to do for my NEW Close To My Heart was Lip Balm. I am a new CTMH consultant and I've always loved CTMH's products. I decided it was time to work on supporting my habit, and I hope share some great projects and fabulous projects with you out there in Blogger land!
First up is a nice natural lip balm. I purchased my lip balm supplies from a company called Starrville, but there are many other wonderful companies out there. And for those of you who have no interest in making lip balms, but want a way to jazz up a tube of what you buy at the store, this project works for you too!
You will need:
Cocoa Butter - I prefer the undeordorized kind because I like the smell of cocoa
Beeswax - I use the pellets
Vitamin E oil - I just buy the natures own gel capsules and squeeze the Vitamin E out
Microwaveable glass dish - I prefer my glass measuring cup
Stainless steel spoon - for stirring
Lip Balm containers - For this project I've used lip balm tubes, but you can jazz up small pots too.
You will notice that you can click on the ingredients and I've linked them to what I've used so that you can get a visual of what I'm talking about.
Now for my recipe:

1 tbsp cocoa butter
2 tbsp parts beeswax
4 vitamin E oil capsules
6 Lip Balm containers
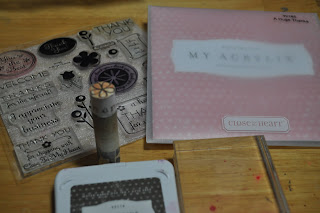
I mix all of the ingredients together in my glass container and microwave the mixture at 1 minute intervals until fully melted. After each 1 minute interval I stir using my stainless steel spoon.
*CAUTION - be careful when removing your glass container from the microwave as it does get VERY hot. Use an oven mit :)

Once the mixture is mixed all the way I put my containers in a row and fill them up to the top. There will be a small mixture of your lip balm left over when you are done. That is fine because you want to be able to add the mixture to your containers once they have cooled. You will see when the mixture cools it sinks in the middle. That is what this leftover is for!

You will notice as your containers start to cool and your lip balm is setting it goes from a translucent color to a solid non see through color. GREAT!
Once your containers are fully cooled down, place lids on them. Now it's time to pull out your Close To My Heart Supplies and make it CUTE! Move on over to my Part 2 blog post now!
First up is a nice natural lip balm. I purchased my lip balm supplies from a company called Starrville, but there are many other wonderful companies out there. And for those of you who have no interest in making lip balms, but want a way to jazz up a tube of what you buy at the store, this project works for you too!
You will need:
Cocoa Butter - I prefer the undeordorized kind because I like the smell of cocoa
Beeswax - I use the pellets
Vitamin E oil - I just buy the natures own gel capsules and squeeze the Vitamin E out
Microwaveable glass dish - I prefer my glass measuring cup
Stainless steel spoon - for stirring
Lip Balm containers - For this project I've used lip balm tubes, but you can jazz up small pots too.
You will notice that you can click on the ingredients and I've linked them to what I've used so that you can get a visual of what I'm talking about.
Now for my recipe:

1 tbsp cocoa butter
2 tbsp parts beeswax
4 vitamin E oil capsules
6 Lip Balm containers
I mix all of the ingredients together in my glass container and microwave the mixture at 1 minute intervals until fully melted. After each 1 minute interval I stir using my stainless steel spoon.

*CAUTION - be careful when removing your glass container from the microwave as it does get VERY hot. Use an oven mit :)

Once the mixture is mixed all the way I put my containers in a row and fill them up to the top. There will be a small mixture of your lip balm left over when you are done. That is fine because you want to be able to add the mixture to your containers once they have cooled. You will see when the mixture cools it sinks in the middle. That is what this leftover is for!
You will notice as your containers start to cool and your lip balm is setting it goes from a translucent color to a solid non see through color. GREAT!

Once your containers are fully cooled down, place lids on them. Now it's time to pull out your Close To My Heart Supplies and make it CUTE! Move on over to my Part 2 blog post now!
Subscribe to:
Posts (Atom)
