Layout

Showing posts with label Close To My Heart. Show all posts

Wednesday, June 6, 2012

CTMH June Incentive


June brings a great incentive for stampers to get their stamping on!  CTMH is offering FREE stamps!
http://cms.closetomyheart.com/~/media/ImageGallery/Time%20Sensitive/Medium/June_2012_CC/Jun2012CC_ImageGallery.ashx?w=400

It’s Stampaganza Time!


June 2012 Constant Campaign


Purchase any two stamp sets (sizes A, B, C, D, or E) at full retail price and receive a third stamp set of your choice FREE (of equal or lesser value)—a savings of up to $29.95!
Stamp sets that count toward the qualifying purchase include full-priced A, B, C, D, and E sets only. Stamps that do not count toward a qualifying purchase include customizable (K), Workshops on the Go™, Cricut® collection, and Stamp of the Month (both discounted and full-priced) sets.

Dates: Offer valid June 1 (9:00 am MDT) – June 30 (11:59 pm MDT)

Shop now to get your favorite sets at MY WEBSITE.

Questions?  Contact me!  I'm available for crops, shopping help, tips and tricks, and just plain talk!

Have a great day!

Monday, March 12, 2012

March Incentives with CTMH

Hey everyone. I just wanted to give you a cute little video involving the March incentive. There are incentives for individuals and for new consultants!

For the individual:

The cute as can be stamp of the month!

Purchase alone for $17.95 or if you purchase $50.00 or more, you can get the set for ONLY $5.00.


For the New Consultant:

The Cricut Art Philosophy Cartridge FREE!!!

Check out this video to learn more! To order online visit my website or just give me a call and I will help you out!


Saturday, February 18, 2012

Fabulous February Deal!

This February CTMH is offering a Buy 1 Get 1 Free on Studio J 5 packs. Buy the first 5 pack at the regular retail price of $55 plus tax and get the 2nd one FREE. This is an amazing deal! Here is what the 5 pack includes:

5 - 2 page layouts
5 Memory Page protectors
FREE shipping!

Everything you need is included in your 5 pack and it is a GREAT way to try out Studio J if you haven't before and if you have, its a great way to continue your journey and give the gift to a friend or family member.

I tried Studio J for the first time not too long ago thinking I'd just like to have some samples to show customers what they finished product looked like, and I was so impressed that I'm HOOKED!

Here is what I made:

I think what I like best was that if I really wanted I could add 3 dimensional items to make them 3-D, but I loved these so much I didn't change a thing.

If you are interested, please visit my website Craftastic Scrapping and order today! Remember this is only available in February!

Saturday, January 7, 2012

Story Time Cubes

Here is the post as promised showing what I did with one set of my collage blocks from the Rock The Block promotion that CTMH is having right now.

I made Story Time Cubes: Here is what they are!


Story cubes are a cute game or educational tool for the classroom or family. You choose a minimum of 3 dice (you can choose all of them). Using the pictures that show after the dice have been rolled, make up a story that incorporates all of the pictures on the dice. You can do verbal story telling, written stories, you can even have the next player roll and they have to add on to the existing story with what they've rolled. A GREAT GAME with 10 million combinations!


Materials:

1 Set of Collage Blocks
Patterned Papers (I used some of my retired CTMH paper to do this: Olivia, Paper Garden, Perfect Day, and Grace)
Ink (Hey you can't stamp without inks! I used Cocoa Ink, Desert Sand, Sorbet, and Twilight... CTMH ink of course!)
Stamps (There are too many sets to list here, but the object was to find all kinds of different images from my sets so that I could cover all sides of the blocks (that's 54 sets of images))
Modge Podge
Foam BrushLink
Liquid Glass
Sponge Daubers
Stickers
Round Sponge
Ruler


Here is what I did:

1) I measured the block sizes and I cut base pieces to cover the blocks in various patterns from my paper. (2" cuts were perfect!)

2) I used Modge Podge to fix these to the blocks. I DID NOT paint the top of the paper with the Modge Podge, I just painted the block and affixed the paper. (Make sure you leave time for them all to dry and don't place them too close together... you may get them stuck if you used to much Modge Podge!)

3) Once everything dried, I used the sponge daubers to give a little color to all the edges. Just pick the ink you want to use, and daub away!

4) Once that was done it was time to cut the pieces that I was going to stamp on. I used a creme colored card stock and cut them at 2" also.

5) After all the cutting was done, I selected my stamps and went to town stamping! You have to do 54 DIFFERENT stamps for this game... so get your stash ready!

6) After stamping, I cut around them.

7) Next I used the the round sponge to color the edges. I made sure I colored the edges of each one to match the pattern paper I was going to adhere the stamped image too.

8) To adhere, I used liquid glass this time. LOVE THIS STUFF!

9) Now its time to work on the base! I simply used the ruler to measure the outside sides of the bottom base and the inside of the base. Then I cut patterned paper for the outside and creme for the inside. (This is where the rules for your game are going to go)

10) I used stickers I had from a retired level one paper packet and markers to write up my rules.

11) I adhered everything using liquid glass again. (Ha Ha... look at the twix wrapper.. wonder how that got there!)

12) And voila! You have a great game for classroom or family time!


* I haven't done this yet with mine, but you will want to put a top sealing coat on all of your blocks and the base piece. That way when the dice are rolled often you don't lose the quality of your work! I'm flirting with spraying a clear gloss coat on and then using a shellac type covering.


I think my next project will actually be a picture collage! What are you making?!

Sunday, July 17, 2011

New Catalog... A great Deal! A Great Sunday!

Close To My Heart has finally unveiled their fall/winter catalog to their consultants and man is it AWESOME! Customers can view the catalog beginning Aug 1 on my CTMH website. But... I'll give you a little sneak preview what is new:

1 - EXCLUSIVE Cricut Cartridge! This cartridge has over 700 cuts and comes with 3 stamp sets and 3 chipboard sets! Best of all the catalog is layed out showing you what stamping sets the cricut cartridge has cuts for! ONLY $99. And there is buzz that for the August launch there will be a purchasing incentive to make it 1/2 off! I'll let you know when I know more!

2 - Stamp price DECREASE! Yep... some of the stamps and stamp of the month stamps have new pricing.

3 - GORGEOUS new papers. I don't want to spoil it but for all those zebra print fans, lets just say there is a set that has you in mind!

4 - AWESOME holiday sets! Papers for fall, Halloween, and Christmas! And of course... gorgeous stamps for all the holidays.

I can't wait for you to be able to see all the wonderful things CTMH has done for this upcoming season!

Now for my steals and deals! Today I went into Michael's to get some Cricut mats for my cricut. I always wander back in to the clearance section to see what I can find... And I found a GREAT deal.


Yep. Retails for around $69.95.... and I paid $29.99! I'm so excited for the upcoming workshops!!

And... I think I've fallen in love with a new cutting system. Not that I don't LOVE my cricut... but... check out the Pazzles. Crazy name AMAZING things you can do.
Visit the Pazzles Website and check it out!

Just a quick overview:

1 - No cartridges
2 - This machine can cut, WRITE, distress, emboss, etch, and well... the list goes on and on. This is a definite must LOOK at!

Plus... they even have a commercial version for those that are in business.... just saying...


If you google "Pazzle $99" you can find the link to pay only $99 for this machine instead of $599 by getting a two year subscription to the Pazzles craft room. They also have a $199 option with a 1 year subscription which if you can afford the extra bucks up front makes this machine cheaper!

Happy shopping :) If you get one let me know what you think. I'm trying to hold out and not do it, but I don't think I'll hold out for long!

Wednesday, June 29, 2011

Card Challenge

Hey everyone, I made a little card for a card challenge you can see HERE. The theme was buttons, so I got my inspiration from a card in the Originals book by Jeanette Lynton and this is what I came up with:


Here is what I used:

Fanfare B&T's X7138B
pg 13 Originals by Jeanette Lynton
Dutch Blue Ink Z2119
Tulip Ink Z2166
Sunkiss Yellow Ink Z2151
Thoughtful Seasons (Happy Birthday Stamp) D1299
Jubilation (Fireworks stamp) D1457
Shining Star (Star Stamp) D1320
Foam adhesive (to make things pop)
Daisy Buttons

Have a great card for buttons? I'd love it if you'd share! Happy Crafting!

Saturday, June 18, 2011

New Techniques

Ever since I became a crafting kind of girl, I've always looked for new and interesting ways to make my pieces more one of a kind, and more detailed. I look at trends, but I also hunt down videos on how to do new techniques to bring new dimensions to my crafting. My first love in crafting was for hand made cards. This probably started when I was a little girl making little cards and cut outs for my parents when I was in school. If you have kids, then you know the cards I'm talking about. Happy Mother's Day! Happy Father's Day! Merry Christmas! I can remember working to my heart's content on the best card my parents had ever seen. I did after all have 3 other siblings to compete with! As I've grown older, my desires for my cards have changed. Now I try to create cards that the receivers study and hopefully enjoy for the little details that went into making each one.

Since I'm all about new techniques, I am going to share one I thought was pretty cool. Close To My Heart has rub-ons that are too cute to believe. Yes they are letter and numbers, but they have newspaper typeset within them! How cool! Here is a short demonstration video about how to use them!


Access Video HERE!


I have been busy making cards, and have added the rub-ons on my must have list! I am already imagining the cards I can create. I will upload some of the work I've been working on soon, but don't want to spoil the surprise for those who are receiving them! This is a busy time of year for me with lots of birthdays, anniversaries, and holidays!

If you are interested in ordering the rub-ons or the chocolate ink, please shop at my CTMH website.

If you've created artwork with the rub-ons, or do in the future, please feel free to share your artwork! I'd love to see what you've created.

Have a Craftastic Day!

Sunday, June 5, 2011

Masculine Card

I love when inspiration for something comes from several different sources. My inspiration for this card came in part from the Lucky Workshop On The Go kit (G1018) and a sketch challenge that I saw over on Paper Craft Planet. I essentially combined the two to create this:


Here is what I used:

Lucky Workshop On The Go (Papers and Instructions) - G1018
A Tulip Stamp Set - A1111
Enjoy Life Stamp Set - C1439
Kraft Borders - Z1377
Mocha Adhesives - Z1333
Finishing Files - Z1091
Topiary Ink - Z2155
Moonstruck Ink - Z2134

Here is what I did:

1. Cut out the dimensions as laid out in the Workshop On The Go kit.
2. Picked a Kraft Border from my set that I liked.
3. Picked my Inks and the stamps I wanted to use.
4. I put the card together similar to Card 2, but I added the Kraft Border and moved the paper labeled "D" into the base area of the card.
5. I first distressed all of the edges of my B&T papers.
6. I then seasoned my new stamps and used a mixture of the Topiary and Moonstruck inks to stamp the images on the papers I wanted.
7. I then adhered the papers in the order I wanted to get the type of layering I was after.
8. My last and final touch was to put the Mocha Adhesives along the Kraft border for a little 'POP'

I really love the Lucky Workshop On The Go kit. It provides SO MUCH PAPER to make all kinds of cards and scrapbook layouts. The only limit is your imagination!

This card is a great masculine card, and with Father's Day coming up who couldn't use one of those! Until next time, have a Craftastic Scrapping time!

*Please note that I added elements to my card that were not included in the Lucky Workshop On the Go kit, however the kit contains EVERYTHING you need to do projects similar to the one I have done!*

Saturday, June 4, 2011

How to Make Lip Balm AND Make It Cute! PART 1

The first project I wanted to do for my NEW Close To My Heart was Lip Balm. I am a new CTMH consultant and I've always loved CTMH's products. I decided it was time to work on supporting my habit, and I hope share some great projects and fabulous projects with you out there in Blogger land!

First up is a nice natural lip balm. I purchased my lip balm supplies from a company called Starrville, but there are many other wonderful companies out there. And for those of you who have no interest in making lip balms, but want a way to jazz up a tube of what you buy at the store, this project works for you too!

You will need:

Cocoa Butter - I prefer the undeordorized kind because I like the smell of cocoa
Beeswax - I use the pellets
Vitamin E oil - I just buy the natures own gel capsules and squeeze the Vitamin E out
Microwaveable glass dish - I prefer my glass measuring cup
Stainless steel spoon - for stirring
Lip Balm containers - For this project I've used lip balm tubes, but you can jazz up small pots too.

You will notice that you can click on the ingredients and I've linked them to what I've used so that you can get a visual of what I'm talking about.

Now for my recipe:

1 tbsp cocoa butter
2 tbsp parts beeswax
4 vitamin E oil capsules
6 Lip Balm containers


I mix all of the ingredients together in my glass container and microwave the mixture at 1 minute intervals until fully melted. After each 1 minute interval I stir using my stainless steel spoon.

*CAUTION - be careful when removing your glass container from the microwave as it does get VERY hot. Use an oven mit :)


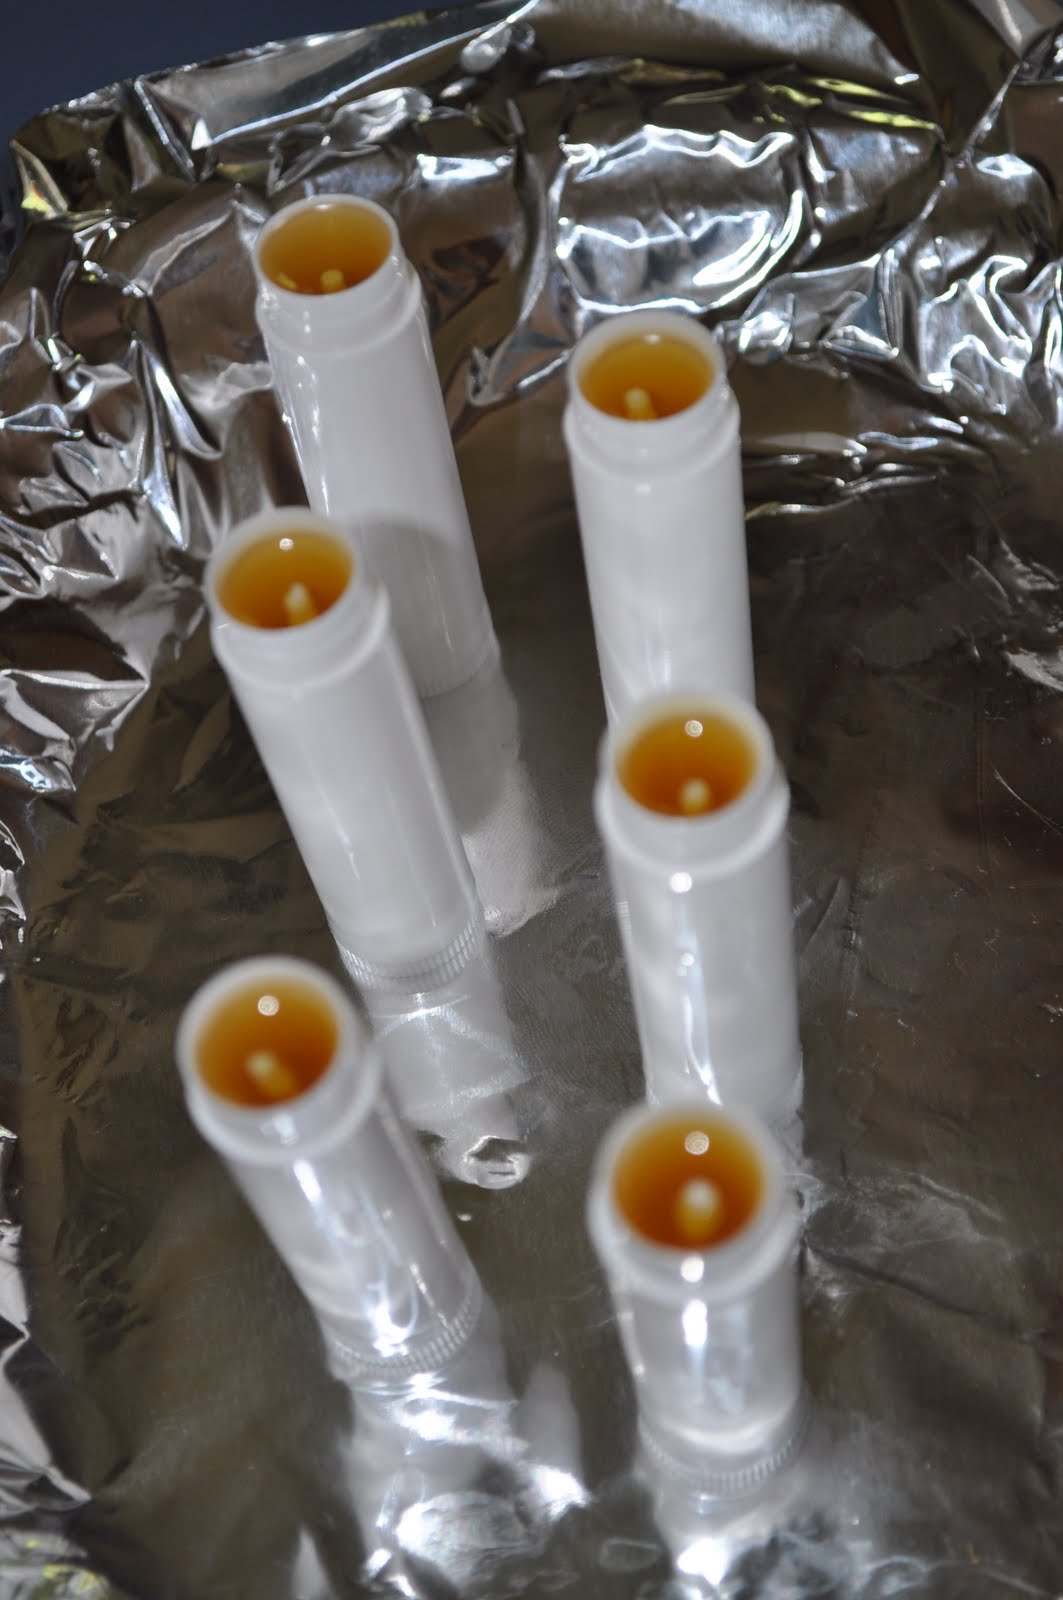
Once the mixture is mixed all the way I put my containers in a row and fill them up to the top. There will be a small mixture of your lip balm left over when you are done. That is fine because you want to be able to add the mixture to your containers once they have cooled. You will see when the mixture cools it sinks in the middle. That is what this leftover is for!

You will notice as your containers start to cool and your lip balm is setting it goes from a translucent color to a solid non see through color. GREAT!

Once your containers are fully cooled down, place lids on them. Now it's time to pull out your Close To My Heart Supplies and make it CUTE! Move on over to my Part 2 blog post now!